Friday, September 2, 2011

Dreams of the Jolly Green Giant


Corn-on-the-cob means a summer’s barbeque.  Orville Redenbacher’s corn means being curled up on the couch watching a chic flick on a winter’s eve.  Creamed corn means the Jolly Green Giant package in the freezer, the one right next to the frozen Succotash.  But until last night, I had never used corn as the base ingredient for homemade soup. 


This week’s French Fridays with Dorie featured corn soup.  So I sent my erstwhile companion to the market armed with a copy of the recipe and instructions not to return home until he had secured all the ingredients in a fresh format.  I'm diligent in the kitchen and rarely take short-cuts.  For example, I don’t grab the Campbell Potato Soup can from the pantry, pour its contents into a pot, add some canned clams and call it “Clam Chowder” as so many restaurants do.  Fortunately, there is no reason to take any shortcuts with this recipe (unless you want to save some chopping and dicing time by purchasing Trader Joe’s Mirepoix). It is a simple, fresh and easy recipe that can be made quickly, even after a hard day’s night.


I can tell a good Italian restaurant from the cooking aromas that surround you upon entering.  Similarly, I can tell a good soup from the fragrance of the ingredients as they blend together during the cooking process.  This dish emits a panoply of wonderful fragrances, with the rosemary being predominant.  Such was this recipe’s allure that my two “sous chefs” were drawn from the first televised college football game of the year to investigate.  It's always a good sign when cooking aromas draw people to the kitchen, particularly during football season.


At first, I was worried the soup would be a little too thin for our preference, and it seemed that way while cooking in the pot even though I withheld about ¾ cup of the required water. However, I was immensely pleased with the final result after using my trusty immersion blender.  The soup had a chowder-like consistency with colorful bits and pieces of the red Jalapeño pepper, carrot, celery and red onion adding great visual contrast to the creamy yellow of the corn.  The interplay between the sweetness of the corn and the spice of the red Jalapeño pepper tickled my fancy and fit my mood for the evening-- sweet and spicy--and the crisp bacon garnishment added a nice counterpoint to the cool and silky crème fraiche.


This is a wonderful soup that stands on its own merit when prepared as Dorie suggests.  But, in my opinion, it can be turned into a fabulous seafood chowder by simply adding some fresh shrimp, lobster and/or crab (I wouldn’t add clams because they would not complement the flavors of the soup). 


I am eager to try this recipe again. Fortuitously, there is just enough left over for one bowl. Wonder which one of us will get lucky at lunch today....?

Friday, August 26, 2011

Cafe Salle Pleyel Hamburger


I am a Montana native with a cattleman grandfather, so I have pretty strong opinions when it comes to beef. Quality beef should be prepared simply, without too much fuss or window dressing, so the flavor of the meat can shine through. In my view, this approach should be applied to hamburgers as well filet mignon and rib-eye steaks. 


This week’s selection is "Cafe Salle Pleyel Hamburger."  This recipe has garnered much favorable attention, and reputedly makes the best hamburger in Paris. The reviews and commentary made us cautiously eager to see what a sinfully delicious hamburger would be like.  I say “cautious” because both my companion and I like the “simple is better” approach.  In fact, he valiantly lobbied against the cornichons and capers, but we eventually settled for the recipe as presented in Around My French Table by Dorie Greenspan.


A good hamburger needs good meat, so we got good ground sirloin--as specified in the recipe-- but also a mixture of equal parts ground sirloin, chuck and brisket.  This allowed us to see how Dorie’s ingredients worked with a traditional and somewhat untraditional beef base.


The foundation for this recipe is the onion marmalade that provides a ketchup/mustard substitute and subtle, caramelized onion flavor and texture. But, in general, the recipe reminds me of a meatloaf preparation.  Oil-soaked sun dried tomatoes are drained and chopped and added to a mini-food processor with capers, fresh parsley, tarragon and cornichons. It is the equivalent of putting all your condiments and garnishes together, mixing them up and adding them to the meat. This combination creatively eliminates the need for the traditional egg and bread crumb mixture used to bind the patties (or the meatloaf).  Because capers and cornichons are participants, I was a little light on the salt and pepper and this was reflected in the final result. If you try this at home, don't be as cautious as I was when seasoning with salt and pepper.


The meat patties held up well when cooked in the cast iron pan.  No breakage! Three minutes per side is probably enough for medium-rare sirloin burgers, but we cooked the sirloin/chuck/brisket meat patties about thirty seconds longer on each side for the same doneness.  The hamburger is adorned with shaved parmesan cheese curls that add an element of sophistication in appearance and are a nice departure from the standard slabs of American or cheddar cheese.  We used sesame seed buns, and they worked just fine.  But we really wanted something more interesting, like a tasty brioche bun, to compliment this fashionable recipe.  


The result was a moist, well cooked and visually attractive hamburger whose homogeneous textures and flavors made us long for an In-and-Out hamburger.  There was no crunch of crisp lettuce, no explosion of juice and flavor from a tomato slice, and no firmness of meat in which to sink your teeth.  The flavors of the various ingredients were unassertive and the onion marmalade blended with the texture of the meat patty to the point we could not tell where one stopped and the other began.  Such was the overall homogeneity of the dish that we could not tell the sirloin hamburger from the sirloin/chuck/brisket hamburger.


Considering the rave reviews this hamburger recipe has garnered, I am willing to try again.  Perhaps the fault lies with the chef.  But next time I am going to try also a few alterations that meet my personal tastes and see how that compares with the original recipe.  Stay tuned for the results. 


Friday, August 19, 2011

Eggplant Caviar

Eggplant Caviar

Summer in the Palm Springs area is long and hot with temperatures over 100 + degrees for approximately 120 days each year.  So chilled soups, salads and seafood dishes are de rigeur on the local menus.  But one tires of the same old fare and I am always looking for something new, fast and easy to prepare.  Recently I found just such a dish. 

Fresh Ingredients at the ready

French Fridays with Dorie features a new recipe from Dorie Greenspan's cookbook Around My French Table. This week’s featured recipe is Eggplant Caviar.  No real or faux caviar is involved, just wonderfully fresh, light and refreshing ingredients.  Roasted eggplant is the platform for a dish that is accentuated with fresh cilantro, basil, thyme, lemon zest, lemon juice, garlic, olive oil , salt, pepper and cayenne.

This is a no fuss - no muss dish whose summertime benefit is that you can start it, spend 45 minutes relaxing by the pool, and come in and finish it off in minutes.  There is so little preparation work needed that even the most challenged significant other should be able to help.   
Poking the eggplant with fork

Eggplant after roasting in over for 45 minutes

Fresh lemon zest & juice, with a little black garlic

Fresh basil, cilantro, thyme, onion and tomato

Removing roasted eggplant from shell


Mixing eggplant with fork to desired texture

The good stuff - fresh and full of zest

Ready for pita chips, veggies or bread - maybe even a little pasta

Sante!

Monday, July 18, 2011

Truffle Stuffed Roast Chicken ala Joel Robuchon

Sasha the Wonder Dog, and Truffle Lover

Snort . . . snort, snort . . . snort!  What the . . . ?  Was that Sasha the Wonder Dog snoring or had some crazed vermin found its way into the house?  When my head cleared a bit, I realized I had been dreaming about one of life’s great pleasures:  Tuber, or the fruiting body of an underground mushroom, better known as the “Truffle.”  Sniffed out by truffle hogs or truffle dogs, the “diamond of the kitchen” (as so described by 19th-century French gastronome Brillat-Savarin) have been prized as a source of sustenance and culinary magic (and perhaps mind altering experiences as well) for many millennia.    


Among the criteria for culinary diva membership are (a) recognition that Joel Robuchon is a culinary genius and that his Las Vegas restaurants are the best that town has to offer and (b) an addiction to fresh truffles.  Should you happen to be a culinary diva on a budget-- what a nasty word; who invented that anyhow--skip the restaurants and delve into your copy of The Complete Robuchon.  Unless you live in Europe and own your own truffle hog or truffle dog, I am going to assume that, like me, you will need to outsource your truffles.  For the price of two gourmet coffees a day, you can indulge in fresh summer black truffles.   Seriously, do you want an overpriced, overhyped, over-prepared coffee or a summer black truffle?  It is a no-brainer for a true culinary diva.


We are currently knee deep into the summer black truffle season.  This is an occasion not to be missed, just as you would not miss the special anniversary sales at Nordstrom during which triple rewards points are given. White truffles are the most rare and fragrant and sell for thousands of dollars per pound.  The record price per pound is greater than the median home sales price in California these days.  Think of them as that little black Chanel dress you have always wanted.  Summer black truffles are more affordable than their sister, the white truffle, and pack enough aroma, flavor and texture to enhance almost any entree.  Think of them as the little black dress by Kate Spade.


I was eager to dig into my batch of summer black truffles that had journeyed overnight from Italy in the cool confines of a FedEx jumbo jet (white truffles ride upstairs in first class by comparison).  While Italy produces 20% of the black truffles, France produces 45%, so I looked for inspiration and guidance among the cookbooks from my favorite French chefs.  How could I go wrong seeking the wisdom of Hubert Keller, Alain Ducasse or Joel Robuchon, the holder of more Michelin stars than any other chef on this planet? A winning trifecta, most assuredly!!!  


In the end, I went with Joel Robuchon who described the gentle placement of truffle slivers under the skin of the chicken in near orgasmic gastronomic terms.


What follows is my adaptation of two recipes found in The Complete Robuchon.  This book is surprisingly user friendly and was designed so anyone can enjoy his creations at home.  I combined a roast chicken recipe with a roast potato recipe and added celery and carrots to the mix.  The result is a one-dish feast in which the succulent chicken, oozing with the flavor and aroma of summer black truffles, is complimented by vegetables that are knock-your- silk stockings-off great!


Truffle Stuffed Roast Chicken – a la Joel Robuchon

All you need to make the perfect truffle roast chicken


Kitchen Items:


Roasting pan

Kitchen string and scissors

Bottle of French wine (for consumption while prepping and cooking)


Ingredients:


Fresh summer black truffles - slivered and lightly soaked in olive oil (not extra virgin - just plain, high quality olive oil)

Blanched tarragon leaves

Blanched parsley leaves

Softened unsalted butter (3-4 tablespoons)

Fresh thinly sliced mushrooms (optional)

Whole organic chicken (about 3 pounds)

Olive oil (3-4 tablespoons, regular, not virgin, plus what is needed to soak the truffles)

Potatoes (quartered and not peeled)

Carrots (peeled and quartered)

Celery (quartered)

Salt and pepper

Fleur de Sel (yes, I know salt is listed above, but you also need Fleur de Sel)

Water


(Please note, I have not intentionally left off the amounts for the majority of the ingredients.  They simply were not provided by Joel Robuchon.  So this is a bit of an intuitive recipe, and you know a woman's intuition is never wrong!)


Important Tip when Roasting Poultry:  Do Not Preheat Oven!  Turn oven on just when you put the roasting pan in.  The gradual rise in temperature will leave the meat more tender and moist.  In addition, Joel Robuchon roasts his chicken on each of its two sides first as this is the thickest portion of the chicken and takes the longest to cook.


Blanching the Parsley & Tarragon


Technique:


After the chicken is thoroughly cleaned and patted dry, and before it is trussed, carefully slide your fingers between the skin and meat to create some space.  Be gentle so as not to break the skin or completely remove it from the meat.  Start at the neck and go all the way to the tail, gently working one or two fingers between the skin and meat, pulling apart ever so gently.  Continue this process with the breasts and thighs.  Then into the space you have created slip slivers of truffle, fragrant mushrooms (if desired), blanched tarragon and parsley leaves, and softened butter.  


Ice Bath for Blanched Herbs


Slivered Truffles, Blanched Herbes and Olive Oil waiting their fate


Steps:


1) Remove the chicken and butter from the refrigerator 20 minutes in advance.  Thoroughly clean the chicken, inside and out, and pat dry.


2) Generously grease the roasting pan with softened butter.  


3) Season the cleaned chicken generously and evenly with salt and pepper, inside and out.

Seperating chicken skin for stuffing

Stuffing the chicken with slivered Truffles, blanched herbs


4) Use the technique described above to stuff the skin of the chicken with truffles, mushrooms (optional), parsley, tarragon, and softened butter.


5) Truss the chicken.


6) Drizzle olive oil on the outside of the chicken and lightly season again with salt and pepper.


7) Placed the trussed chicken on its side in the middle of the roasting pan.


Roasting Chicken on the side, not resting on veggies

8) The vegetables (potatoes, carrots, celery) are placed around the chicken in the roasting pan.  Do not put them under the chicken.  They are not a nest.


9) Drizzle olive oil and sprinkle salt and pepper on the vegetables.


10) Place the roasting pan in the oven, turn on to 410 degrees, and roast for 25 minutes.


11) Remove the roasting pan from oven and place the chicken onto its other side. (This can be accomplished by using tongs, or sticking a large fork into the joint between the thigh and drumstick - without piercing the flesh - and using the fork and a large spoon to move the bird.  You do not want to lose the juices.)

Ready to flip Chicken to other side for even side roasting


12) Pour 3 tablespoons of water over the chicken and return the roasting pan to the oven for 25 minutes.  Rotate the roasting pan a quarter turn if your oven size allows.


13) Again remove the roasting pan from the oven and place the chicken on its back.  Return the roasting pan to the oven and cook for 10 minutes.  Rotate the roasting pan a quarter turn if your oven size allows.


14) Again remove the roasting pan from the oven and place the chicken on its breast and cook for 5 minutes more.  Rotate the roasting pan a quarter turn if your oven size allows.

Almost done, and the house is filled with the aroma of roast chicken and truffles


15) Remove the roasting pan from the oven and prick the thigh joints to make sure the chicken is fully cooked.  The juices should run clear with no trace of blood. 


16) If done, transfer the chicken and vegetables to a platter and season with Fleur de Sel and pepper.  Tent loosely with aluminum foil and let the chicken rest for 20 minutes, breast side down and with the tail end propped up so that the chicken is almost vertical.


17)  Roast Chicken Perfection!  Serve immediately after opening second bottle of wine to enjoy with meal!  A good Chablis or French-style California chardonnay goes really well with this dish.


Santė


Saturday, July 9, 2011

Summer Vegetable Stacks


“Chestnuts roasting on an open fire . . .nips of Jim Beam to keep warm.”  Oops, I'm confusing my seasons, although the holidays are only five months away!  Yes, we are in one of my very favorite seasons.  No, not a Four Seasons as you might expect from prior blogs, but the “Grilling Season.”  One cannot open a food magazine or gaze at a Williams-Sonoma window this time of year without seeing something about or related to grilling.    

I love the Grilling Season for when else can you dirty only one plate in the process of cooking an entire meal?  Clean up is a snap, you can enjoy the great outdoors with a cocktail in hand, and, voila, in 15-20 minutes dinner is done. Use disposable plates and utensils and you have my kind of meal. 

In the past, the Grilling Season meant getting out the Weber, dousing charcoal briquettes with enough gasoline to make a pyromaniac jealous, dropping a match on the saturated pile and hoping your eyebrows remain intact.  Nowadays whole magazines and HGTV shows are devoted to creating the quintessential “outdoor kitchen.”  Throwing some “shrimp on the BBQ” takes on a whole new meaning.

While an outdoor kitchen is hardly necessary for good grilling, the concept has opened our eyes to the possibilities for outdoor cooking.  Hot dogs and hamburgers are no longer de rigueur.  Now the adventurous are cooking pizzas, vegetable dishes and even desserts.  It is amazing how a little char and a smoky flavor enhance everyday dishes.

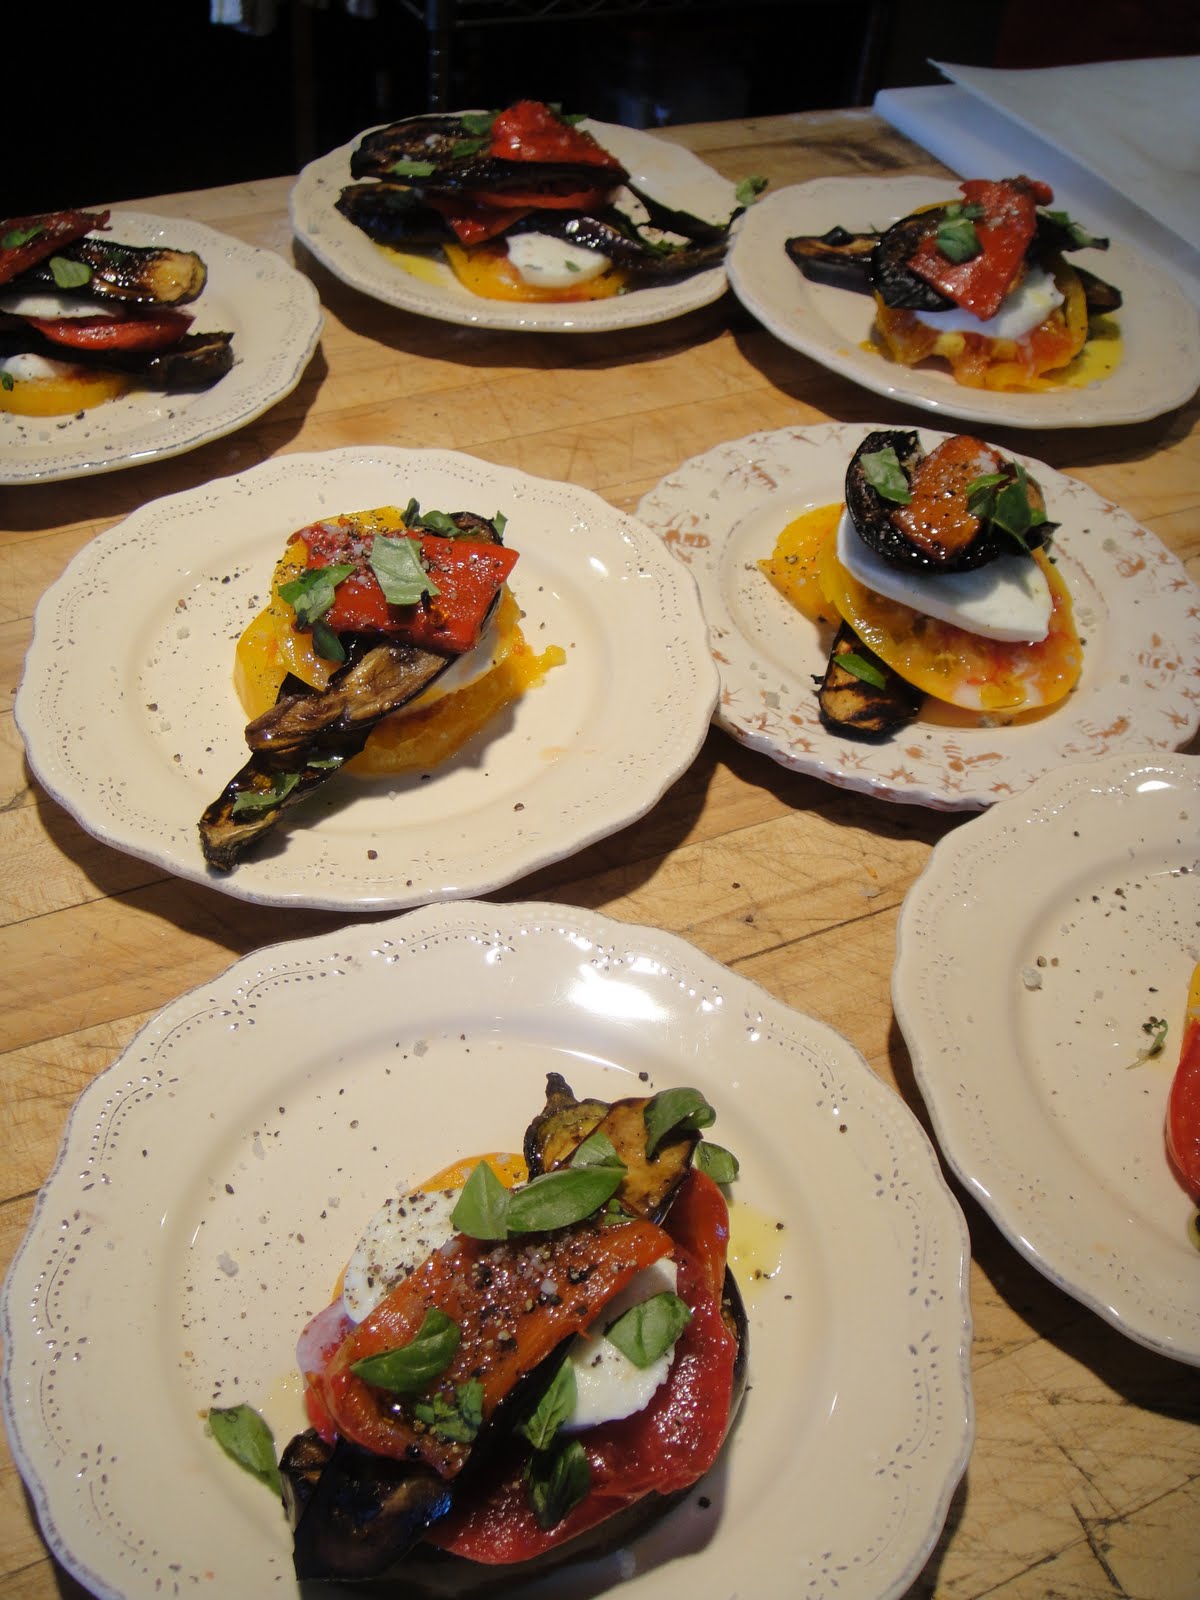
The following recipe incorporates fresh summer vegetables with that smoky-char that brings another dimension to the dish.  And best of all, it can be done ahead of time, which makes it perfect for entertaining.  I made this dish at Georgeanne Brennan's “Provence in California Class”  and the recipe is found in her recent cookbook, "Cheese:  Williams-Sonoma."  I've made it several times since the class and it has become part of my summer menus.  

The layering of flavors, contrast of textures, beautiful colors and, of course, fresh, quality ingredients, make each bite dance across your taste buds.  I am reminded of long summer days in the French countryside, perhaps the Loire Valley.  It is an enduring dish that gives simple pleasures that make you smile and dream of another place with every bite.

Summer Vegetable Stacks (serves 4):

Equipment:

Grill - charcoal or gas (the charcoal gives a better flavor layer but gas will work if you don't have charcoal)
Tongs
Plate
Plastic Bag
Ice cold cocktail or glass of rose wine (optional, but highly recommended)

Ingredients:

4 small eggplants, sliced lengthwise into 3 pieces each
2 red bell peppers, seeded and cut lengthwise into quarters
1/4 cup extra virgin olive oil, plus more for drizzling 
2 tablespoons balsamic vinegar
1 teaspoon sea salt for sprinkling
1/2 teaspoon freshly ground black pepper, plus more for sprinkling
8 heirloom tomato slices
2-3 balls of fresh mozzarella cheese, preferably buffalo milk, cut into 8      circular slices
Handful of torn fresh basil leaves

Put the eggplant slices and the bell pepper quarters in a bowl and add the olive oil, balsamic vinegar, salt, and pepper.  Turn several times, then let stand for 30-60 minutes, turning once or twice.  Meanwhile, preheat a grill to medium-high and oil the grill rack or grilling basket.

Arrange the eggplant slices and bell peppers directly on the grill rack or in a single layer in a grilling basket.  Cook until the eggplant slices and bell pepper quarters are lightly charred, 6-7 minutes for the eggplant and about 4 minutes for the bell pepper.  Turn and cook until the second sides are brown and charred.  The timing will be about the same.  Transfer the eggplant slices to a platter.  Put the bell pepper quarters in a resealable plastic bag, seal closed, and let cool.  When cool enough to handle, peel away the charred skin with your fingertips.

To assemble each stack, place a tomato slice on each plate, then stack the remaining ingredients on top in the following order: cheese, eggplant, bell pepper, and eggplant, seasoning each layer with salt and pepper.  Drizzle with olive oil and garnish with the basil leaves.  Ready to serve!

Georgeanne recommends pairing this dish with a high-acid, crisp white wine like Muscadet, Soave, or Pinot Bianco.  If you prefer a red, she recommends Tempranillo. 

Santé!


Wednesday, June 29, 2011

Goat Cheese Souffles

Goat Cheese Souffle with Herb Garden Salad
I am intrigued by travel and food, and not necessarily in that order.  So I was immediately drawn to a book titled "A Pig in Provence" by Georgeanne Brennan.  I enjoyed the book so much I researched Georgeanne and found she is a proponent of “Slow Food” (seasonal dishes using local products) and the author of numerous Williams-Sonoma cookbooks, as well as her own series of cookbooks.  When I learned she conducts cooking classes from her home in Davis, California I was interested.  When my companion explained where Davis is located and that it is less than an hour from the Sacramento Airport to Napa Valley, a plan for a wine/cooking travel adventure was formed.  With girlfriend Ellen in tow, off I went to experience firsthand Georgeanne’s Slow Food culinary approach.
Georgeanne giving the class a tour of the garden we would be cooking from

Over the course of two days, we prepared and sampled numerous dishes.  Working in tandem with Ellen, we prepared a Goat Cheese Soufflé.  It was a class favorite and a really practical (as in you can do it in advance) way to wow guests at your next dinner party.  The soufflé can be made up to six hours prior to serving, or even the day before if refrigerated.  We served the soufflé with a salad with fresh herbs which really added a complementary element of flavor and texture. 

(Note:  Please read entire recipe before starting as the order of steps is very important.)

Prepping ingredients for the Souffle

Goat Cheese Soufflé with Garden Salad

Kitchen Equipment:

Electric Beater
Skillet
8-5 ounce ramekins
Mixing bowl
Baking pan

Ingredients:

3 tablespoons butter plus extra for coating ramekins
1 cup of breadcrumbs (make from day old bread in blender)
3 tablespoons cake flour (preferred because is lighter than all-purpose flour)
1 cup milk
10 ounces soft goat cheese
3 large egg yolks
1 cup egg whites (about 7 large eggs)
kosher or sea salt to taste
pepper to taste
hot water for water bath

Position the rack in the center of the oven and preheat the oven to 425.  Butter 8-5 ounce ramekins, making sure to coat them well.  Coat ramekins with bread crumbs then turn over and tap out any excess crumbs.  Keep remaining crumbs for later use in recipe.

Ellen prepping ramekins

Crumble 8 ounces of the goat cheese into a large mixing bowl. 

Using an electric mixer with clean, dry beaters, beat the egg whites in a large clean, dry bowl until stiff peaks form.

Melt 3 tablespoons of butter in a stainless steel skillet over medium high heat.  Whisk in the cake flour and cook for 20 seconds, whisking constantly.  Add the milk and cook for about 1 minute, whisking constantly, until the mixture has thickened to the consistency of a thin, pourable pudding.
Pudding like consistency of mixture

Pour the hot milk mixture over the goat cheese and mix well.  Add the egg yolks and mix again.  Season with salt and pepper. 

Fold half of the whites into the goat cheese mixture to lighten mixture, and then gently fold in the remaining whites.
Folding in egg whites to lighten mixture

Divide half of the soufflé mixture among the prepared ramekins.  Crumble the remaining 2 ounces of goat cheese and divide among the ramekins, and then top with the remaining half of the soufflé mixture, dividing equally among the ramekins.  Sprinkle the remaining bread crumbs over the top.
Ramekins filled half full with Souffle mixture and piece of goat cheese

Place the ramekins in a large baking pan and pour in boiling water to come halfway up the sides of the ramekins.  Bake for about 15-20 minutes, or until the soufflés are golden.  Remove from the oven and let stand in their water bath for another 15 minutes.
Souffles after first baking

Remove the ramekins from the baking pan and, using a towel to hold the ramekin in place, run a knife around the inside of the rim to loosen, turn upside down and gently release the soufflé onto a baking sheet.  The soufflés may be held at room temperature for up to 6 hours before the final baking, or cover well and refrigerate overnight.
Turned out on to baking sheet for second baking to brown

When ready to serve, bake the soufflés in a 425 degree oven for 5-7 minutes until light golden brown.

For the Salad:


Chives, flat leaf parsley and heirloom tomatoes
1/4 cup extra-virgin olive oil
1 tablespoon minced shallot
2 tablespoons Champagne vinegar
1/4 teaspoon kosher or sea salt
1/4 teaspoon freshly ground black pepper
1 large head of butter leaf lettuce (aka Boston), red leaf, or a mixture, torn into bite-size pieces
1 cup fresh flat-leaf parsley leaves
1/2 cup fresh cilantro leaves
1/2 cup fresh chives, about 1/2 inch long
10-15 cherry tomatoes halved (or if in a bind, use 1 medium tomato)

In the bottom of a salad bowl, combine the olive oil, shallots, vinegar, salt, and pepper.  Mix well with a fork or whisk.  Add the lettuce, parsley, and chives.  Just before serving, toss.
Dressing mixture

To serve, divide the tossed greens evenly among the plates, and either top or place alongside the hot goat cheese soufflés.
Individual salads waiting for their Souffle
Finished product - mouth watering indeed!

Light, fluffy and perfectly delicious!

Voila!  Goat Cheese Souffle to tempt your palate!